Creamy Homemade Whipped Cream Ice Cream Cake
- Time: 60 min active + 6 hrs 30 mins chilling
- Flavor/Texture Hook: Creamy vanilla layers with a buttery cake crunch
- Perfect for: Summer birthdays or family gatherings
The sound of a freezer door clicking shut is the start of any good ice cream cake. But let's be honest, we've all had that one cake where the bottom layer turns into a soggy, mushy mess the second the ice cream hits it.
It happens when the cake is still slightly warm, or when there's no barrier between the sponge and the frozen cream.
I used to deal with that exact problem until I started using a cookie crumble barrier. It creates a tiny gap that stops the cake from absorbing too much moisture. This Homemade Whipped Cream Ice Cream Cake fixes the soggy bottom issue for good.
You can expect a dessert that holds its shape on the table and tastes like real cream, not stabilizers. It's a bit of a waiting game because of the freezing time, but the results are worth the patience.
Making a Homemade Whipped Cream Ice Cream Cake
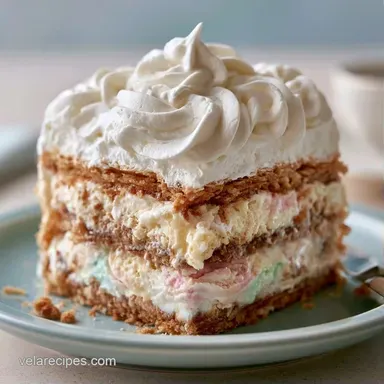
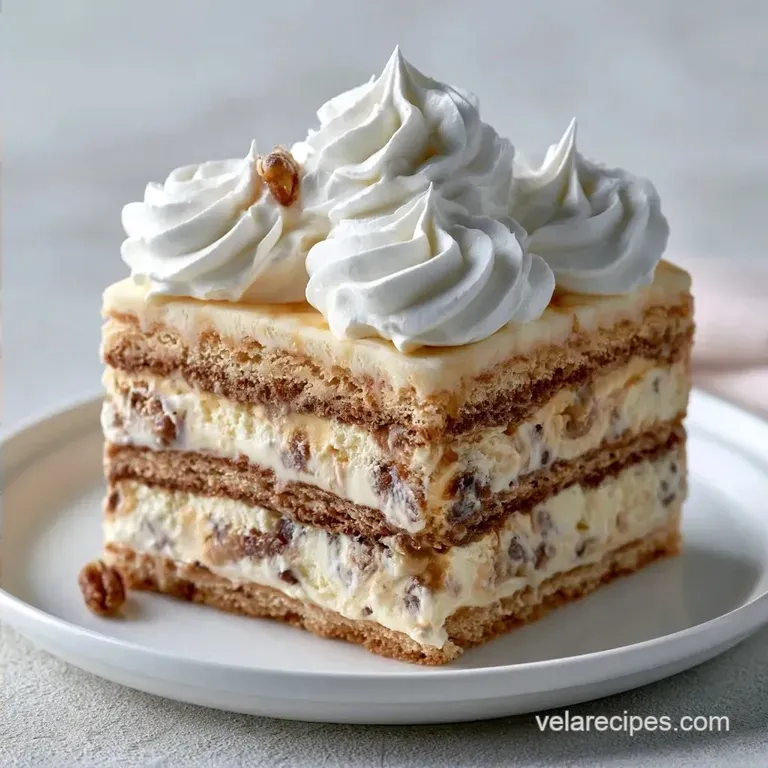
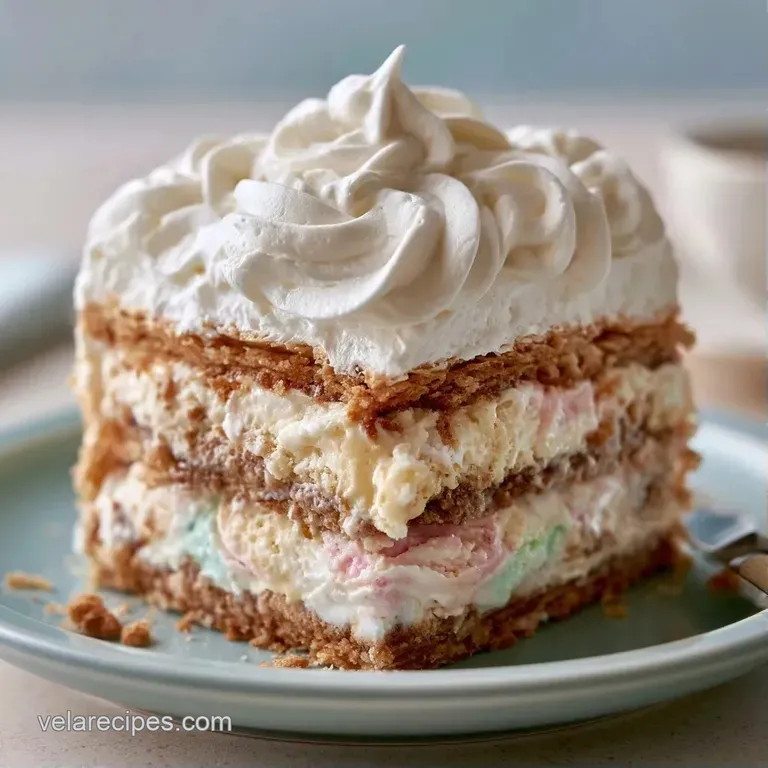
The Cake Base: Using a springform pan prevents the cake from sticking, which means no more jagged edges when you try to remove it.
The Barrier: Crushed cookies act as a shield. This keeps the cake base from becoming waterlogged under the weight of the ice cream.
The Frosting: Adding cream cheese to the whip prevents it from collapsing. According to USDA FoodData, the fat in cream cheese helps maintain the structure of the whipped cream.
Fresh Cream vs. Shortcut Toppings
| Feature | Fresh Stabilized Cream | store-bought Topping | Impact |
|---|---|---|---|
| Taste | Rich and milky | Sugary and artificial | Fresh tastes cleaner |
| Stability | Holds peaks for hours | Stiff immediately | Fresh is more natural |
| Prep Time | 10 minutes | 0 minutes | Shortcut is faster |
What Each Ingredient Does
| Ingredient | What It Does | Best Swap |
|---|---|---|
| Cream Cheese | Stops the whip from melting | Mascarpone (richer) |
| Heavy Cream | Provides the fluffy volume | Coconut cream (dairy-free) |
| Sandwich Cookies | Adds crunch and moisture block | Graham crackers (milder) |
| All Purpose Flour | Gives the base structure | 1:1 gluten-free blend |
Ingredients
For the Vanilla Cake Base
- 1.5 cups all purpose flourWhy this? Standard protein for a sturdy base
- 1 cup granulated sugar
- 1.5 tsp baking powder
- 0.5 tsp salt
- 0.5 cup unsalted butter, softened
- 1 large egg
- 0.75 cup whole milk
- 1 tsp vanilla extract
For the Ice Cream Layer - 1.5 quarts vanilla ice cream, slightly softened Why this? Makes spreading easier - 0.5 cup crushed sandwich cookies
For the Stabilized Whipped Cream
- 2 cups heavy whipping cream, chilledWhy this? Cold fat whips faster
- 0.5 cup powdered sugar
- 4 oz cream cheese, softened
- 1 tsp vanilla extract
Equipment Needed
You'll need a 9 inch springform pan. This is the only way to get the cake out without it falling apart. A rubber spatula is also a must for smoothing the ice cream. For the frosting, a hand mixer or stand mixer such as KitchenAid works best to get those stiff peaks.
Key Steps
Phase 1: Baking the Foundation
- Preheat oven to 350°F (175°C). Grease your 9 inch springform pan and line the bottom with parchment paper.
- Cream the softened butter and sugar until the mixture looks pale. Beat in the egg and 1 tsp vanilla.
- Stir in the flour, baking powder, and salt, then alternate with the milk. Mix only until the streaks of flour disappear. Note: Overmixing makes the cake tough.
- Pour the batter into the pan. Bake for 25-30 minutes until a toothpick comes out clean.
- Let the cake cool completely in the pan. This is the most important part to stop the ice cream from melting.
Phase 2: The Frozen Layering
- Sprinkle the crushed cookies evenly over the cooled cake.
- Scoop the softened vanilla ice cream on top. Use your spatula to smooth it into a level layer.
- Put the cake in the freezer. Leave it there until the ice cream is firm to the touch.
Phase 3: Whipping and Finishing
- Beat the softened cream cheese and powdered sugar together until smooth. Stir in 1 tsp vanilla.
- Slowly pour in the chilled heavy cream. Beat the mixture until stiff peaks form.
- Frost the top and sides of the frozen cake. Use an offset spatula for a smooth look.
- Return the cake to the freezer. Let it set fully before you slice into it.
Avoiding Kitchen Disasters
If your ice cream is too hard to spread, don't force it. You'll just end up punching a hole through your cake base. Let the ice cream sit on the counter for 10 minutes, or microwave it for 10 seconds.
Another common issue is the frosting. If the cream cheese isn't fully softened, you'll see little white lumps in your whipped cream. For a more detailed look at flour types for the base, check King Arthur Baking.
Why Your Frosting Melted
If the cake wasn't frozen solid before frosting, the heat from the cake melts the fat in the cream. This leads to a runny mess.
| Problem | Root Cause | Solution |
|---|---|---|
| Runny Frosting | Cake was too warm | Freeze cake 2 hours longer |
| Grainy Whip | Over beaten cream | Stop as soon as peaks hold |
| Sinking Center | Too much baking powder | Measure with flat top spoons |
If you find this version too rich, you might prefer my Cool Whip version for something lighter.
Make It Your Own
You can easily change the flavor profile here. For a chocolate version, replace the vanilla ice cream with chocolate and use Oreo crumbs for the barrier. If you want something more festive, swirl in some raspberry jam between the ice cream and the whipped cream.
Decision Shortcut:
- If you want more crunch, add toasted pecans to the cookie layer.
- If you want it fruitier, fold fresh diced strawberries into the stabilized whip.
- If you want a larger cake for a party, follow the steps for my whipped cream cake and double the base.
Mini Ice Cream Cake Recipe
To make mini versions, use a muffin tin. Bake the cake batter in the tins for 12-15 minutes. Once cool, add a spoonful of cookies and a scoop of ice cream. Freeze and top with a dollop of the cream cheese whip.
Scaling the Recipe
Cutting it in half: Use a 6 inch pan. Reduce the bake time by about 20%. Since you can't easily use half an egg, beat one egg in a bowl and pour out 2 tablespoons.
Doubling it: Don't just double the baking powder and salt. Increase those by only 1.5x to avoid a metallic taste. Work in batches when whipping the cream, as most home mixers can't handle 4 cups of heavy cream without splashing.
For double batches in the oven, lower the temp to 325°F and bake for longer. This ensures the middle cooks before the edges burn.
Common Cake Myths
Some people think you need to "seal" the cake with melted chocolate to keep it from getting soggy. While it works, it adds a strong flavor and extra calories. The cookie crumble method provides a similar barrier without changing the taste.
Another myth is that you can't use a hand mixer for stabilized cream. You can, but you have to keep the bowl cold. Put your mixing bowl in the freezer for 15 minutes first.
Preservation Secrets
Keep the Homemade Whipped Cream Ice Cream Cake in the freezer in an airtight container. It stays fresh for about 2 months. After that, the cake base can start to pick up "freezer smells" from other foods.
For zero waste, if you have leftover cake batter, bake it in small ramekins for individual treats. If you have extra stabilized whipped cream, use it as a topping for fruit salads or coffee.
Storage Quick Guide:
- Freezer: 2 months (wrapped tightly)
- Fridge:24 hours (but it will soften quickly)
- Thawing:15 minutes on the counter before slicing
Presentation Tips
To get a clean slice, dip your knife in hot water and wipe it dry between every single cut. This prevents the ice cream from sticking to the blade and smudging the frosting.
Decorate the top with fresh berries or a drizzle of chocolate ganache. Because the stabilized cream is so firm, you can pipe small stars around the edge without them wilting. It looks professional but takes very little effort.
Adding a few mint leaves provides a pop of color that contrasts well with the white cream. Serve on a chilled plate to slow down the melting process.
Recipe FAQs
What's the difference between an ice cream cake and a whipped cream cake?
Ice cream cakes have a frozen core. A whipped cream cake is typically a sponge cake with frosting, whereas this recipe layers a baked base with vanilla ice cream and stabilized whipped cream.
What kind of cake is used for this ice cream cake?
A buttery vanilla sponge. We use a blend of unsalted butter, granulated sugar, and whole milk baked at 350°F to create a sturdy base that supports the frozen layers.
How to prevent the cake base from getting soggy?
Sprinkle crushed sandwich cookies over the cooled cake. This cookie crumble barrier creates a physical shield that stops the cake from absorbing moisture from the ice cream.
Is it true that whipped cream alone is enough for the frosting?
No, this is a common misconception. Pure whipped cream can weep or collapse over time; adding softened cream cheese stabilizes the structure so it holds its shape in the freezer.
How to assemble the ice cream layer?
Scoop slightly softened vanilla ice cream over the cookie layer. Use a rubber spatula to smooth the ice cream into a level layer before freezing it until firm.
Can I use whipping cream instead of heavy cream?
Yes, they are generally interchangeable here. Both provide the fat content needed for stiff peaks, similar to the richness found in our blueberry French toast bake.
How to frost the cake without the cream melting?
Freeze the ice cream layer until firm before adding frosting. Use an offset spatula to apply the cream cheese and heavy whipping cream mixture quickly, then return the cake to the freezer to set.
Whipped Cream Ice Cream Cake 2